Come learn how to use our laser cutter! This machine can be used to engrave wood, glass, paper and many other items. It can also cut various thicknesses of wood, acrylic, paper and cardboard.
What You Will Learn
This class will teach you how to use the Morristown Makers’ laser cutter. In the process we will also make a neat Thanksgiving project that you can use as a decoration in your house or on your table.
Create files for the laser cutter using
Inkscape
GIMP
K40 Whisperer
Use the machine safely
Adjust the speed and power of the laser
Who?
This class is for anyone who wants to learn to use the laser to engrave or cut various projects. Adults and young people 13 and up are welcome to come to the class but we ask that a parent or guardian be with anyone under the age of 19.
What To Bring
In this class we are working on a project that will utilize the laser to cut out a Thanksgiving decoration (but we will also learn how to use it as an engraver). We will apply glue and glitter to the final project. We have gold and red glitter. If you would like to use some other color in your project, then please bring your own glitter to class.
You are also welcome to bring your own computer and we can make sure the software is set up correctly.
These are settings (or ranges) that work well with the Morristown Makers 3D printer. You are welcome to deviate from these settings for testing, but it is recommended that you change one parameter at a time so that you know the effect each change has.
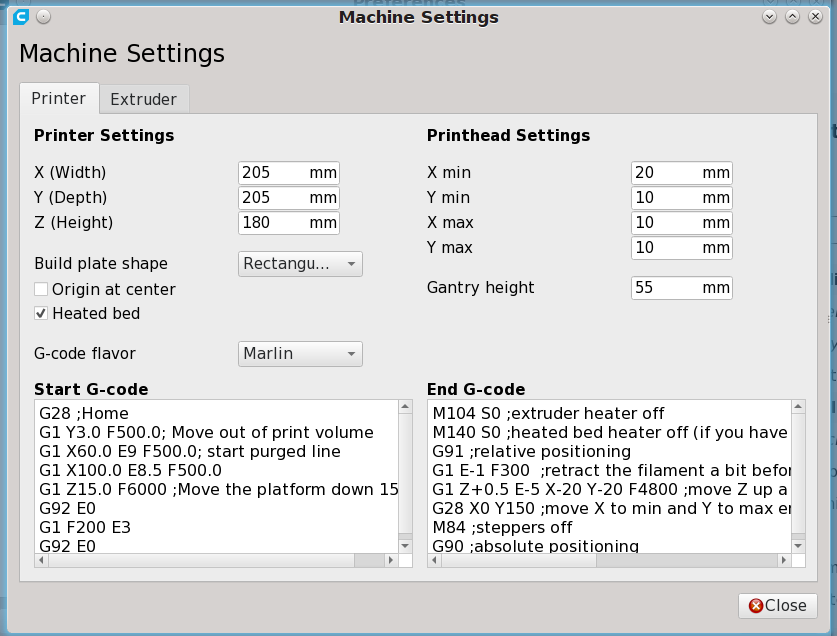
Printer-Level Settings
These are the sections and settings inside Cura 4.1. You should only need to set this up one time in your slicer and then never have to change the settings for this printer in the future.
Printer Tab
Printer Settings
X, Y, Z: 205, 205, 180
Build plate shape: Rectangular
Heated bed: Yes
G-code flavor: Marlin
Printhead Settings
X min: 20 mm
Y min: 10 mm
X max: 10 mm
Y max: 10 mm
Gantry height: 55 mm
Start and End G-code Settings
These are the settings that were in use when the printer was donated to Morristown Makers. You can change the start and end G-code as needed. Or, you can use a generic start and end code.
Start G-code:
;*** Start Dual Nozzle/Bed Preheating *** M140 S{material_bed_temperature_layer_0} ; start preheating the bed M104 S{material_print_temperature_layer_0} T0 ; start preheating hotend G28 ; home M190 S{material_bed_temperature_layer_0} ; heat to Cura Bed setting M109 S{material_print_temperature_layer_0} T0 ; heat to Cura Hotend ;*** End Preheating *** G92 E0 ;Reset Extruder G1 Y3.0 F500.0 ;Move out of print volume G1 X60.0 E9 F500.0 ;start purge line G1 X100.0 E8.5 F500.0 G1 Z15.0 F6000 ;Move the platform down 15mm G92 E0 ;Reset Extruder G1 F200 E3 G92 E0 ;Reset Extruder
End G-code:
M104 S0 ;extruder heater off M140 S0 ;heated bed heater off (if you have it) G91 ;relative positioning G1 E-1 F300 ;retract the filament a bit before lifting the nozzle, to release some of the pressure G1 Z+0.5 E-5 X-20 Y-20 F4800 ;move Z up a bit and retract filament even more G28 X0 Y150 ;move X to min and Y to max endstops, so the head is out of the way G92 E0 M84 ;steppers off G90 ;absolute positioning
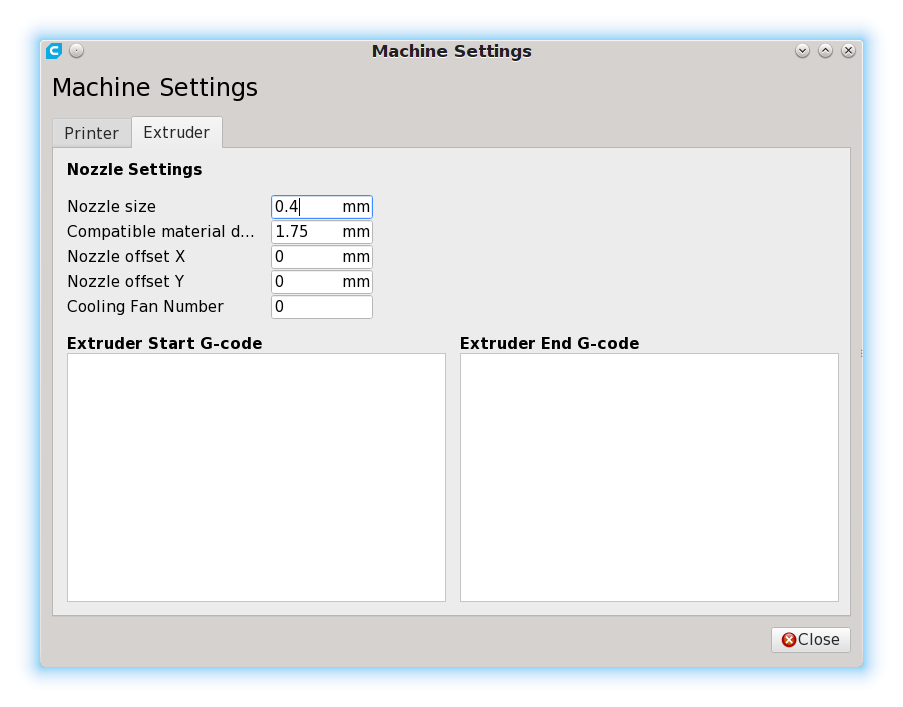
Extruder Tab
Nozzle Settings
Nozzle size: 0.4 mm
Compatible material diameter: 1.75 mm
Nozzle offset X: 0 mm
Nozzle offset Y: 0 mm
Cooling Fan Number: 0
Per Model Settings
The per-model settings can be downloaded and imported into Cura as a profile. This was exported from Cura 4.1, but you should be able to import it into the current Cura version. Unzip the the archive and import the .curaprofile into Cura.
Layer Height
0.1 to 0.2
0.16 seems to be a good compromise between speed and quality.
Initial Layer Height
0.16: This should always be 0.16 regardless of the layer height you set for all the other layers.
Line Width
0.4: This is the nozzle diameter. You can adjust this up and down a little, but generally it should not be changed. This is typically always set to your nozzle diameter.
Shell Thickness
Wall Thickness
0.8: This means 2 outside perimeters. You can increase this in 0.4 mm increments (i.e., 0.4, 0.8, 1.2, 1.6, etc.).
Top and Bottom Thickness
0.8: This is determined by how many solid layers you want on top and bottom multiplied by your layer thickness. If you are printing 0.16 layers and want 5 solid top and bottom layers, you will have a 0.8 mm thickness.
Retraction
Yes: Enable retraction almost always. Flexible filaments print better without retraction.
6 mm
Infill Density
25%: This can go up or down depending on your needs. But 25% is a good mix between strength and speed.
Temperature
Printing Temperature (Hotend)
205° C: This is material specific. Different filaments (even regular PLA from the same manufacturer) will need different temperatures. Generally, all the PLA used on this machine prints well in the 205° range. Adjust as necessary.
Build Plate Temperature (Heated bed)
50° C: Technically PLA does not need a heated bed. However, having some heat on the bed seems to help with adhesion.
Print Speed
30-60 mm/s: There is a marked quality difference between 30 and 60 mm/s (slower is better). However, you can expect that it will take approximately twice as long to complete a print at 30 mm/s as it does 60 mm/s.
Recommended 50 mm/s: This printer can print accurately up to 70 mm/s but quality suffers.
Cooling
Enable Print Cooling
Yes
Fan Speed
80%: Faster than this and the hotend struggles to stay up to speed. And, at 80% it cools sufficiently.
Supports
Depending on your needs
Build Plate Adhesion
Depending on needs, but a skirt of at least 1 perimeter is recommended to help prime the printer.
This sewing class builds on the basics we learned in the previous class. This time we will continue to practice our sewing skills but add information about cutting material down to the sizes you need for your project.
Skills You Will Learn
Cutting fabric
Machine setup
Cutting tool options and use
Who Should Attend
This is still a basic sewing class; therefore, it is appropriate for anyone who feels like they need a bit more instruction before being turned loose on a machine by themselves. Or, you may be curious about how to sew but have never even tried it. This class is for you.
You do not have to have attended the previous class to attend this one.
What to Bring
Bring a sewing machine if you have one available to you. We will try to have an extra machine or two, but our preference would be that you practice on the machine you will actually be using at home. If your machine does not work, or does not work well, bring it along and we will try to help you get it up and running.
If your machine does not run, send us an email or a message through our contact form and we will see if we can get together for a short time before class to get everything working properly before class begins.
This is the third class in our three-class series on 3D printing. While it is helpful to have attended the slicing class, it is not necessary.
What You Will Learn
This class is focused on the machine setup side of 3D printing. You will learn:
How to level the bed
How to prepare the print surface (glue, tape, slurry, hairspray, etc)
How to load or change filament
How to load a file for printing
Troubleshooting through each of the steps
Who Should Attend
3D printer at Morristown Makers
Certainly if you have taken the design and slicing classes previously, you will want to learn this final step in the printing process. However, you can come to this class and learn this critical part of the process without having attended the previous classes.
While we will use the Morristown Makers’ printer for this class, almost all of these steps will be similar on any other filament-based 3D printer. If you have access to another machine that you are wanting to learn how to use, this class will be a great benefit to you.
Note: We will not be talking about resin-based printing or laser-sintering machines.
What To Bring
There is nothing required for this class other than a willingness to learn how 3D printing works. You won’t even need hearing protection or safety glasses for this activity.
Want to learn to sew? This class will teach you how to thread your machine and get started.
Who Should Attend?
This class is not intended for tailors and seamstresses. If you feel awkward, or maybe even scared, around a sewing machine, this class is for you.
What to Bring?
If you have a machine (no matter how old or what its condition is), bring it along and learn how to set it up. If it isn’t working, we will see what we can do to repair it.
However, you do not need to have your own machine to attend and benefit from the class.
The bandsaw is one of those versatile woodworking tools that is often underappreciated. They can be used to cut thick pieces of wood (or metal) into complicated shapes. A bandsaw can do things a router and table saw cannot do.
What You Will Learn
Bandsaw basics (advantages, purpose, etc)
Safety
Saw and material setup
Choosing the right blade for the job
This is a basic woodworking class. You do not need previous bandsaw experience to attend this class. The class is open to ages 13 and up; however, those under 19 must have a parent or guardian present.
Here are some links that might help you in learning more about building foam board airplanes. These are some of the things mentioned in class as well as extra resources that will help you in building other planes.
For the most part these are resources that will help you in building Flite Test plans. However, many of the skills learned in printing and building their planes will be useful when building other models out of foam board.
Printing Plans
Printing the plans can sometimes be difficult to get right. I have found that these instructions by SP0NZ always work for me. SP0NZ, by the way, is the guy who did the layout work for many of the planes that Flite Test creates.
The FT Tiny Trainer is the plane we built in class. You can download the plans from the linked page by going to the “resources” tab in the middle of the page. You can get some written instructions on the build process from their website. Also the build video can be seen below.
Build a glider out of Dollar Tree foam board! This project is a great activity for parents and children. While we will be building the glider version of this plane in class, you will take home the plans to build an RC powered version if you would like.
Who Is This Class For
Families who want to build a plane project together.
RC enthusiasts who want to venture into the world of scratch building.
Those interested in learning techniques to build structurally strong objects from simple $1 foam board.
Individuals who just want a fun project.
What You Will Learn
You will learn the techniques required to build a majority of the planes that Flite Test offers. While you can buy any of their pre-cut plans, you can also download their models for free and cut them out using Dollar Tree foam.
In this class we will learn how to take their plans and turn them into planes. We are building just one of their 60+ planes. If you like model planes (RC or not), you should check out Flite Test’s YouTube channel.
Come join us for an introduction into the hobby of scratch building your own planes!
You don’t need to bring anything to the class other than an enthusiasm to build a plane and learn how to build them on your own.
Cost of Class: $25
You can come alone or bring a friend or child with you. The cost of the class includes the material and instruction to build one glider.
Interested? Curious? Possibly intimidated? When it comes to woodworking the router is one of the most advantageous and versatile machines in the shop, and quite possibly the most confusing and under-utilized. Come and learn the basics of this wonderful machine. We will be looking at the different sizes of routers and their purpose, the various ways to handle each one, and cover many of the various bits and joinery that is possible with a router. Finally we will use what we learn to craft a keepsake photo project that you can take home.
Take home a router project that you can mount a picture on.
Who is this class for?
Beginner or intermediate woodworker who wants to learn more about using a router in your projects.
Someone with no woodworking experience.
Skills you will learn.
Safe operation of a router
Different types of routers and bits
Why one router is better suited than another for a certain job
Specific router recommendations
This is a basic class open to any age (under 19 will need a parent or guardian present at all times) and will provide an opportunity for a “hands on” experience.
This is a companion post to the paper instructions we are handing out at the 2019 Kingsport Mini Maker Faire. If you don’t have that paper, you can download it to help you build your own infinity mirror.
Bill of Materials
The following links are samples of what is needed. Certainly there is nothing that requires these exact materials. Some of the items you can find locally or might even be able to snag for free from your home or by asking around.
The links to Amazon below are affiliate links.
LED strips
In the mirror we had at the Maker Faire we were using red LEDs. But you can choose your color to personalize the mirror the way you want. You can even buy strips that have a remote so that you can change the color according to your mood.
The strip we used in our build was 12 volt LEDs. This is the most common and generally cheaper option. You can find 5V strips that can be run with a cell phone charger. Typically they are a bit more expensive.
There are a couple of helpful things to know if you have never used LED strips before. First, they can be cut to length at the little copper pads between the LEDs. There are 3 lights per section on 12V strips and only 1 light per section on 5V strips. You must cut at the copper pads between the sections for them to work properly after cutting.
Second, you have to ensure that you have enough amperage from your power supply to power the number of LEDs. That said, for a project this size, at 12V you only need a 500 mA (or greater) current supply.
Power Supply and Connectors
12V power supply for the mirror.
You probably have plenty of power supplies in a box or drawer at home that can run this project. If you have 12V LEDs you will need a 12V supply. Make sure you have a 5V supply if you have 5V LEDs.
The power supply we are using for our project is from an old network router. There are plenty of these types of supplies to be found for $1-3 at most thrift stores.
The front of the mirror is plain glass with window tinting film applied to it. Our infinity mirror was based off the size of the glass we had lying around. It is the scanner glass from a disassembled home printer. All other dimensions for our mirror were based on that.
Alternately, you can use a one-way (also called a two-way) mirror instead of glass and tinting film. This is the type of mirror that you can see through from one side but is reflective on the other side. You can skip using the tinting film if you use one of these very expensive mirrors.
Tinting Film
There are some films that probably work better than others; however, just about any film you get will work to some degree. Even plain glass with no film will work, it just won’t look as nice.
If you have a window tinting shop in your area you might take your glass to the shop and see if they have a piece of scrap tinting film that will fit your glass. More than likely they will have plenty in a trash can.
However, if you need to buy some tint film, the more “mirrored” the reflection is, the better the effect. You can buy enough film on Amazon to do a dozen mirrors for less than $10.
Rear Mirror
Mirror sandwiched between a thin sheet of plywood and the rabbet cut into the edge of the frame. (The front of the box is facing the table below).
The rear of the box is just a regular mirror. Or, it could be another piece of glass with tinting film on it. It won’t be as reflective as a regular mirror, but it will work. You will want to add some type of backing (a thin piece of plywood will work) if you are using plain glass with tint film. A piece of plywood is also recommended (but not necessary) if you are using a regular mirror. This will help protect the back glass/mirror of your infinity mirror.
Assembly
Main Box
Cut 4 boards that are slightly larger than your front glass. Or, read through some options below to know how large your wooden box needs to be.
Assemble your 4 boards in the manner shown on the paper handed out at the Mini Maker Faire (or the PDF download). You want the box to be slightly larger than the glass and mirror you are using.
Even though we put a frame on our tinted front glass, we also cut a rabbet into the frame.
You can cut a rabbet in the box to set your front glass into. And then you can cover with some more decorative wood. That is the way our mirror is assembled. Or, you can just attach your glass to the wood and cover with a paper or wooden frame.
If you do not have a router or table saw to cut a rabbet, you could make your frame large enough that your glass can just sit inside the wooden box. Then attach some small strips of wood to the inside of the frame that the glass can rest on as you put a more decorative frame on the outside of the glass and box.
This is certainly an area where you can get creative in your assembly of the box and attaching the glass.
LED Strip
The LED strip in place. The one closest to us in the picture in the real one. The one in the back is reflected off the front tinted glass.
From the back of the box (with the front glass in place) draw a line around the inside of the box where your LED strip should be attached. For the best result your LED strip needs to be exactly centered between the glass and mirror.
The easiest way to get power into the box is through a power jack on the side or bottom. Ideally you would want to put power through the back of the infinity mirror. But that would require drilling a hole in the back mirror.
Power jack on the side of the mirror.
Our power jack is on the side of the box so that it can easily sit on a desk. If you plan to hang your mirror on a wall, you might want to put your power jack on the bottom of the box.
Back Mirror
Because this is the side that does not show, this does not have to be as pretty as the front. Whatever way you attach the rear mirror to the box, you will want to make sure it is easily removable. This is so you can get into the infinity mirror to make changes or replace LEDs if you want to put a different color light strip into the box.
Ours just has a piece of thin plywood screwed to the box between the mirror and the edge of the box. This sandwiches the mirror in place but allows easy access if something needs to be repaired or changed.
Enjoy Your Mirror!
Now it is time to enjoy your mirror. It is a simple project that is fun to show off. It isn’t too complicated of a project but it can yield stunning results. We hope you enjoyed seeing ours at the Mini Maker Faire in Kingsport.